Welcome to our family's dinner menu. Our household has gluten, dairy, egg, and soy allergies so these recipes and menu ideas reflect that diet.
Showing posts with label pizza. Show all posts
Wednesday, January 27, 2016
Chicken Pizzas with Sausage and Mushrooms - Paleo and Whole30 Friendly
My family loves pizza! This grain free diet has been hard on our normal pizza cravings. In fact my son asked my husband the other night if he brought pizza home when he arrived home from work. We rarely order pizza but he really wanted some. I first discovered chicken pizzas when our local news station talked about how to grill pizzas by using a flattened chicken breast as the crust, grilling the chicken and then tossing your normal toppings on top after you flip the chicken over. All while on the grill. When we had a family meal this spring that required low carbs, I made this but in the oven and people enjoyed it. This week I didn't really have the time nor the energy to flatten out the chicken breasts and pre-grill them for our pizzas so I made more of a chicken pizza oven casserole instead. It was super easy!
Chicken Pizzas with Sausage and Mushrooms
Serves 4
1.25 lbs. chicken breasts
1/2 lb. sausage, cooked
8 oz fresh sliced mushrooms, washed and cooked
12 oz pasta sauce (I use Aldi's natural marinara)
Miyoko Schinner's Nut Parmesan Cheese from her book Artisan Vegan Cheese (optional)
Directions:
Preheat oven to 350 degrees. Cook chicken breasts in a frying pan until brown on both sides and juices run clear. Place chicken breasts in an 8 x 8 baking dish. Cover chicken breasts generously with pasta sauce. Top chicken breasts with cooked sausage and cooked mushrooms. Sprinkle nut cheese on top. Bake at 350 degrees for 20 minutes or until sauce is hot. Serve immediately.
Labels:
allergies,
dairy free,
dinner,
egg free,
gluten free,
Paleo,
pizza,
soy free,
Whole30
Sunday, June 21, 2015
Mini Tortilla Pizzas
I've always been a huge pizza lover. The only problem is that it takes a long time to make it, especially when I make dough from scratch. My other issue is that the crust isn't exactly cheap even if I make it from scratch and especially not if I use a mix. I thought back to my college days when I was too lazy to make food and would throw a sandwich wrap from the deli section on a cookie sheet and use it as a pizza crust. Why couldn't I do something similar with corn tortillas? (Which by the way are SUPER cheap!) So I went to work and have made these lots of times since. Oliver likes them too because they are nice and small. They are easy to have the kids make their own too.
Step 1: Make your crusts. I've done these a couple ways so it depends on your preference. Whatever you do though, don't cook these in the microwave unless you want a pile of mush! Lightly butter (using Soy Free Earth Balance of course) a corn tortilla on both sides. Using either a non stick skillet or griddle fry the tortilla on both sides or until crisp. I've also lightly buttered tortillas and then made them crisp by placing them under a high broiler. This goes fast though and I have burned them a few times so you really have to watch them and turn them every minute or two. Personally I prefer the griddle because I can cook so many at a time. More often than not though I'm too lazy to pull that thing out and clean it so I do the frying pan instead.
Step 2: Place your crusts on a cookie sheet. Top with pizza sauce, toppings of your choice and Daiya cheese. Place the cookie sheet in the oven on a high broiler, watching carefully. Move the sheet around as needed to get pizzas evenly browned.
Step 3: Remove from the broiler and cut into fourths. Crust will likely be somewhat soft in the middle but for the most part I am able to pick up these little triangles and eat them as finger food.
Step 4: Enjoy! Just make sure you make enough. Tortilla shells are low calorie so these aren't super filling. Plus if you have a little one in the house like I do, you end up having to share half your pizza!
Disclaimer: It is always important to read labels because brands frequently change their ingredients. These ingredients and brands work for my family but some may be processed in the same facility as wheat, soy, dairy and/or eggs and therefore depending on your severity may or may not work for your family.
Friday, March 27, 2015
Pizza Crust
I love pizza!! Gluten free pizza mix can be expensive and to be honest, some of them aren't very good, even though I've just paid $4-$5 for it. This recipe tastes great. It has a crunchy bottom but soft dough between the bottom crust and toppings. I will just forewarn that the bottom is pretty crunchy though and that some might find too chewy. It holds together nicely though and is easy to pick up and eat unlike some gluten free crusts. As leftovers it was less crunchy and was perfect in my opinion.
Pizza Crust
Yield: 1 - 10 x 15 inch pan crust
1/2 cup tapioca starch
1/2 cup potato starch
1/4 cup millet flour
1/4 cup corn flour
1/4 cup sorghum flour
1 3/4 cup white rice flour
1 teaspoon xanthan gum
1 teaspoon salt
2 Ener-G eggs (1 tablespoon Ener-G egg powder plus 1/4 cup water)
1 tablespoon olive oil
1.5 cups warm water
1 package or 2 1/4 teaspoon yeast
Directions: In a small bowl, mix Ener-G egg replacer powder and water and set aside. In a medium sized bowl, mix the tapioca starch, potato starch, millet flour, corn flour, sorghum flour, white rice flour, xanthan gum, and salt. In a large mixing bowl or Kitchen Aid mixer, place the warm water and yeast and mix well. Then add the Ener-G "eggs", dry mixture, and olive oil. Generously dust a surface with gluten free flour. Roll the dough out, frequently sprinkling flour over the dough until it's large enough to fit the pan. It may be difficult to transfer and you may need to transfer it to the pan in two pieces. Lightly grease the pan and sprinkle some corn meal across the bottom of the pan if desired. Then place the rolled out dough into the pan and press it against the edges. Top with your favorite pizza toppings and bake at 400 degrees for 40 minutes.
Disclaimer: It is always important to read labels because brands frequently change their ingredients. These ingredients and brands work for my family but some may be processed in the same facility as wheat, soy, dairy and/or eggs and therefore depending on your severity may or may not work for your family.
Wednesday, February 25, 2015
Allergy Friendly Meat Lover's Pizza
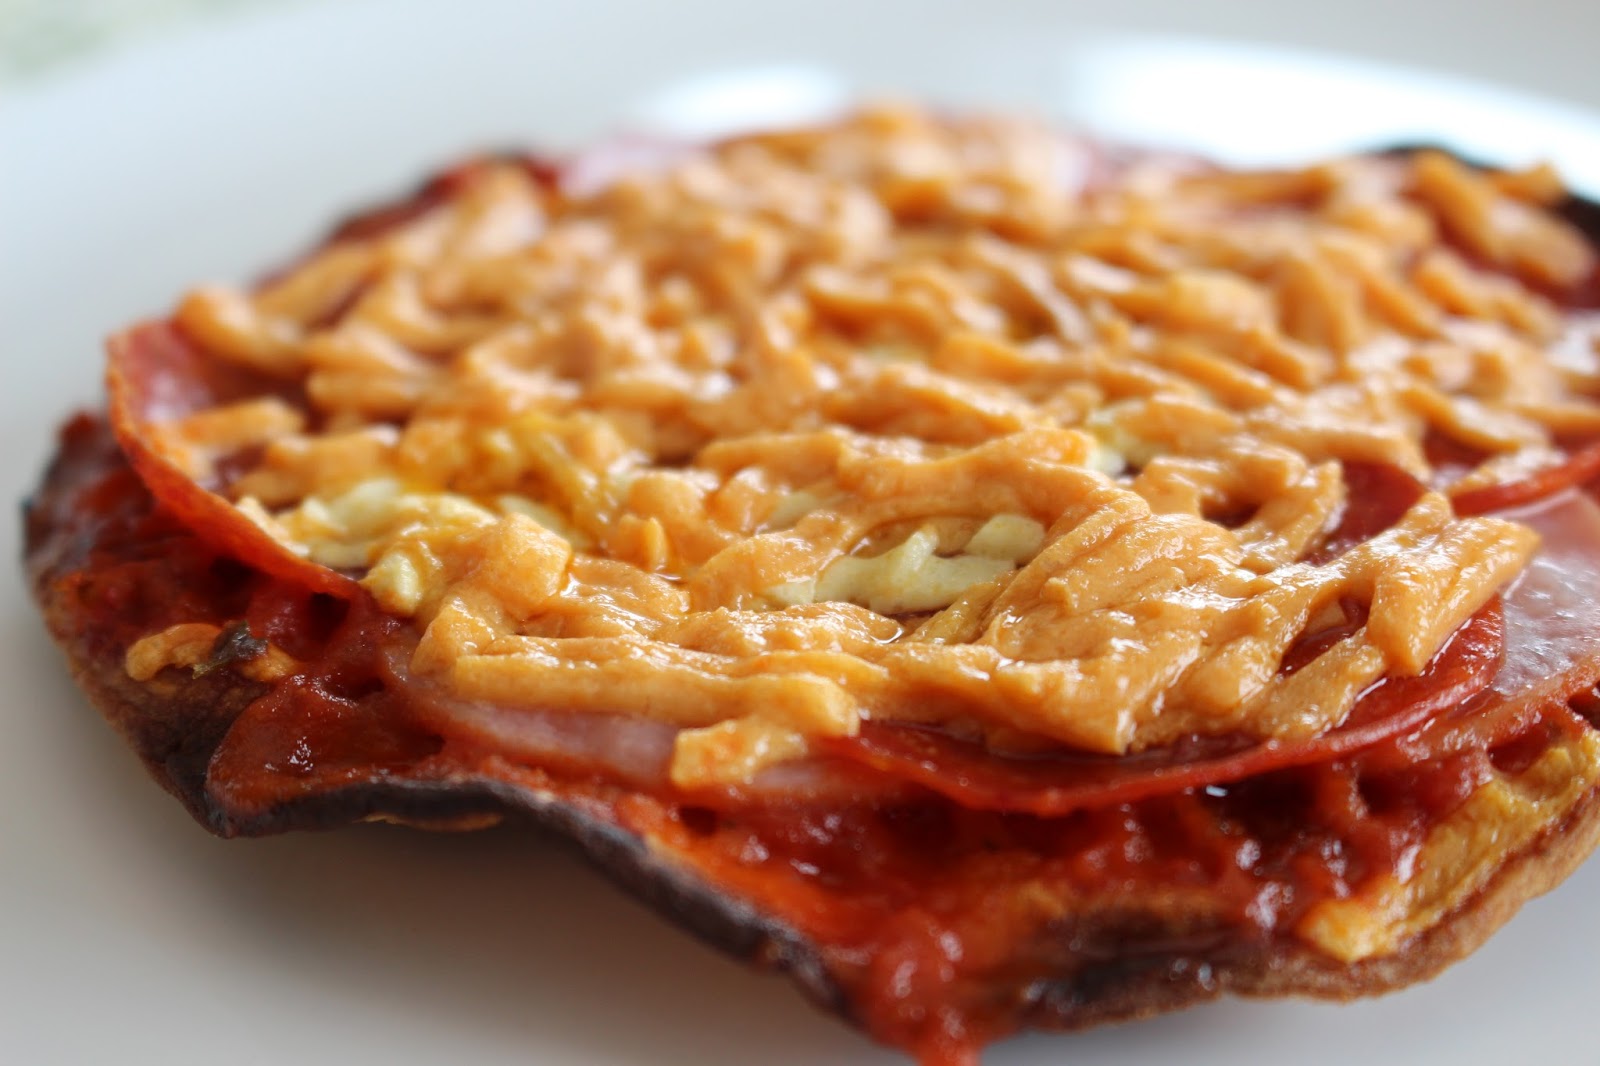
Pizza is a favorite for our family like it is for most families. One thing that makes pizza difficult in our family though, besides allergy people versus not, is our topping preference. I'm sure this happens in a lot of families but ours is pretty opposite so we usually end up making two pizzas: an allergy free pizza and a wheat/dairy pizza. You see, David's brother is a vegetarian and so David grew up with some of your traditional meat pizzas but also a lot of cheese pizza or veggie pizza. In my family, my dad was a pork producer so it was all about the meat. We always ordered the meat lovers pizza from Pizza Hut when we went out for pizza and had tons of meat on our home made pizzas too. David thinks all of my meat is disgusting and I think his veggies are gross. So he had his wheat pizza tonight and I will give you the recipe for my meat one!!
Pizza
Serves about 8
Serves about 8
-1 package Bob's Red Mill Gluten Free Pizza Mix (need ground flax seed, water, canola oil) or use this pizza crust recipe
-1 package (7 oz) Hormel pepperoni
-1/4 lb deli ham (We like Land O Frost Black Forrest because it's labeled gluten free.)
-1 can (4 oz) mushrooms or use fresh and precook
-1 package (7 oz) Hormel pepperoni
-1/4 lb deli ham (We like Land O Frost Black Forrest because it's labeled gluten free.)
-1 can (4 oz) mushrooms or use fresh and precook
-1/2 lb. bacon, cut into bits (Make sure it is gluten free and has no MSG.)
-1/2 lb. ground sausage, cooked (Make sure it is gluten free and has no MSG.)
-1/2 jar (1 jar is 24 oz) soy free spaghetti sauce like some Classico or Prego flavors
-1/2 lb. ground sausage, cooked (Make sure it is gluten free and has no MSG.)
-1/2 jar (1 jar is 24 oz) soy free spaghetti sauce like some Classico or Prego flavors
-1 package (8 oz) Daiya mozzarella style shreds
Directions: Cut bacon slices into cubes and place in a skillet. Bacon seems to cut easier if it is half frozen. In a skillet, fry the bacon until it is brown and crisp. Remove from the pan and place bacon bits on a paper towel to remove the grease. In a separate skillet, fry the ground sausage until the juices run clear and it is completely cooked, set aside. Prepare crust per package directions on a 9 by 13 pan or cookie sheet, using the ground flax seed and water mixture recipe on the package as your egg replacer. Preparing the crust also involves cooking it without any toppings for 8 minutes. While the crust is cooking, dice the deli ham into small cubes and cook the mushrooms if they are fresh. After the crust is done, remove from oven and let cool for a few minutes. Spread spaghetti sauce generously over the crust. Now add the pepperoni, sausage, ham, bacon and mushrooms. Top with cheese. Remember a little of this cheese goes a long way. Bake in the oven at 425 degrees for 40 minutes. Broil on low for about 5 minutes or until cheese is completely melted. Be careful not to burn the cheese or make it too brown. While that sometimes tastes good with cow's milk cheese, it can totally ruin Daiya, in my opinion. Cut into squares and serve immediately.
Disclaimer: It is always important to read labels because brands frequently change their ingredients. These ingredients and brands work for my family but some may be processed in the same facility as wheat, soy, dairy and/or eggs and therefore depending on your severity may or may not work for your family.
Subscribe to:
Comments (Atom)