
I still can't believe my first baby is 2 years old! I should probably be crying but it's been so fun watching him grow up over the past two years. Oliver just loves buses. We have two buses that drive through our neighborhood so Oliver gets to watch two buses for pick up and two buses for drop off. This week I needed to go to school to borrow a bus poster from a teacher friend and Oliver asked if he could ride the bus to school....ok that almost made me cry. With how much Oliver likes buses, I knew we needed to do a bus themed birthday for him this year. My only problem...you can't exactly walk into Party City and buy bus stuff. This party took every ounce of creativity and craftiness I have, plus I recruited some from family and friends, but it turned out pretty cute!
The Invites
I know I could have been a lot more creative on this one but remember this party took every ounce of my creativity so something had to give. I chose to do these invites at Walgreens with just a printed photo card. It was easy because I had this super cute picture of Oliver riding his bus with a backpack on.

The Outfit
Of course Oliver had to look the part for his party. I was going to make him a personalized bus t-shirt with iron on paper but after I had the $4 plain white t-shirt in my cart at the store, I went to look at the clearance and found a monster bus shirt on sale for only $1.50 and decided it was perfect!!
Want some bus pants to go with that bus shirt? Yes please! I found some cute "Wheels on the Bus" printed fabric at Jo-Ann fabrics and used a pair of pants that currently fits Oliver as my pattern to make these pants. I also put some elastic in the waist so they wouldn't fall down. They are not my best sewing job but hey, I had a 7 month old on my lap for part of this last minute sewing project!
.JPG)
The Party Bags
Keeping along with the school theme, we did some paper lunch bags for his party favor bags. I found some bus name tag stickers on Amazon that I used to write each kid's name on. Inside the bag we did more school things like stickers, a little activity notepad, a crazy straw, bubbles, tracer with string, squeeze applesauce, and an individual package of teddy grahams. I bought most of my supplies for these from Dollar Tree.
.JPG)
"Hot Lunch"
The Details: Who remembers those lunch trays from the cafeteria? I do! They seemed so indestructible. I asked around on Facebook and found somebody who sold me 12 vintage lunch trays. These vintage ones are spendy though and we had quite a few people attending so I found some more modern plastic ones at Target for 79 cents a piece and for some reason since I bought so many of them they bumped down to about 60 cents a piece on my receipt.
.JPG)
We also rolled up the silverware in each napkin. As a parent I know how difficult it is to hold the silverware, plate, napkins, and child while you are trying to get them a plate of food. I thought rolling the silverware up would make things a little easier for all the parents we had coming. I printed a bus image on address labels and used those to hold my napkin together. Thanks mom for helping me roll all of them!

I also made stop sign cups. We served pop in cans and bottled water but we did have these cups for those who preferred to drink out of a cup and primarily used these as a snack cup for later in the afternoon when we served Oliver's favorite snacks (nuts, raisins, dried fruit, popcorn, Cheetos, animal crackers and veggie straws.) I used red paper cups and a white permanent Sharpie paint marker to draw on it.
.jpg)
The Food: After polling my family and friends it seems that Italian Dunkers was the most common favorite school lunch. We decided to serve Italian Dunkers, a cheesy French Bread with meat or meatless marinara sauce for dipping. Because we have a vegetarian in the family, we did all plain marinara sauce and had sausage in a separate crock pot for those who wanted to add it. Most of our guests got the full gluten and dairy bread part of this meal but for my mom, sisters, and I with our allergens, I made some modifications.
-Italian Dunkers
 |
| The kids liked the food too. |
- 1 Schar White Bread Loaf Mix
- Soy Free Earth Balance Butter Spread
- Italian seasoning
- garlic salt
- Market Pantry Marinara Sauce
- Gluten free and MSG free cooked sausage crumbles
- Directions: Mix bread mix according to package directions. Lightly grease a 9 x 13 pan and spread bread mix out. It will be somewhat thin. Melt some Earth Balance in a bowl. Use a brush to coat dough with butter. Sprinkle with Italian seasoning and garlic salt and bake in the oven at 400 degrees for 30-40 minutes. Cut into bread sticks. Serve with heated marina sauce and cooked sausage.
- Pre-made mixed salad bags or make your own.
- French Dressing
- We also served croutons and Parmesan cheese for our non allergy guests.
-Green beans (We used the steamer bags.)
 |
| The food line. |
 |
| Photo thanks to my mom! I forgot to take one! |
For decorations I used my resources as much as possible. Remember you can't just go to Party City and buy bus decor. I found yellow tablecloths, balloons, and streamers at Walmart for about $1 a piece. I also used black silverware and dessert plates to tie in that color. A friend who runs a daycare in our town was generous enough to let me borrow her large bus structure for the kids to play with. Another friend found a couple of bus toys at a thrift store. A neighbor and good friend, Liz, that I met in birthing class when I was pregnant with Oliver, has a die cut machine and helped me cut out all the pieces for buses and stop signs to make a banner and some hanging decor pieces. My family helped me put the pieces together and hang them up the night before the party. A teacher friend of mine let us borrow a large poster board bus that she has as decor in her classroom. Dollar Tree has a teacher supply section that had some educational window clings that I put on one of our windows. I also set out some kids crafting supplies to go along with the theme. Most of these items I found at Dollar Tree as well...foam boards, stickers, crayons, markers, eyes, pom poms, foam stickers, etc. I forgot to set it out though until the end so I think Oliver was the only one who actually made something. It all came together rather nicely.


.JPG)


The Cupcakes
I found an idea for bus cupcakes online and made it a little more simple to accent my main bus cake. These were made with a wheat cake mix and Pillsbury frosting for my non allergy guests. I also used vanilla wafers cut to a bus shape, red hots for a stop sign, and leftover black fondant rolled into balls for wheels on top of a red frosted cupcake.
.JPG)
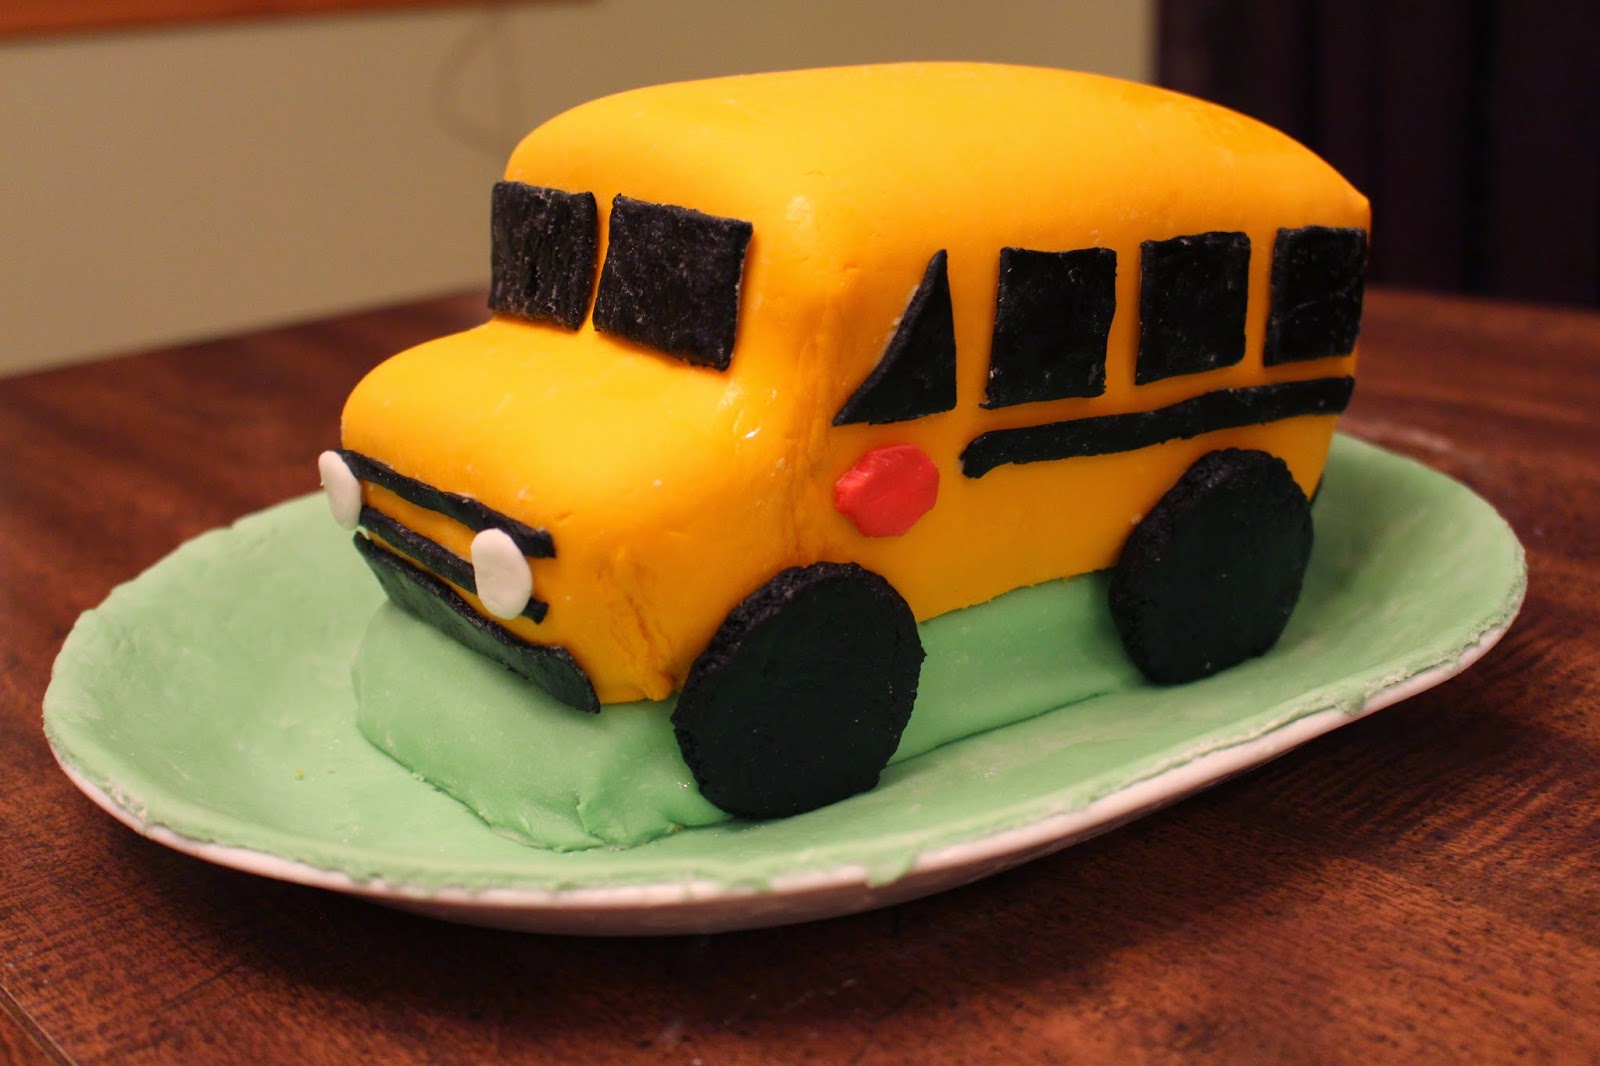
The Cake
Last but certainly not least....the cake! Boy do I have a lot to live up to on this one. My mom often made us cute cakes as kids. I remember having a lion, clown, candy cart, and the number 3. My dad got a pig cake one year. I wanted to carry on this tradition for my own kids. Last year we made Oliver a cookie monster cake but this year with the bus theme, I wasn't so sure how I was going to pull it off. I decided to try my hand at fondant for the first time. Believe it or not, I pulled it off AND it's gluten, dairy, egg, and soy free! Here's how I did it:
Marshmallow Rolled Fondant - I used this marshmallow rolled fondant recipe from Wilton's website. It was easy to make and work with for the most part. I made my fondant a day or two before I needed it and just stored it doubled wrapped in the fridge. I used Wilton's icing coloring for yellow and black but only had food coloring to use for red and green. I highly recommend buying the icing coloring. It's easy, you only need a little (versus the whole bottle of food coloring) and the colors are much more vibrant. I already bought a few more colors for my next cake so I'm not stuck using all my food coloring! Using Wilton's recipe and my kitchen scale, I did a half batch of green, half batch of yellow, 1/4 batch of black, 1/4 batch of red, and a 1/4 batch of white. The black was the perfect amount and green was about right too, especially if you are using a larger base plate. Red and white were WAY too much! Yellow was pretty close but I did have some extra. I'm not sure 1/4 of a batch would have been enough though.
Buttercream Frosting - I needed a frosting to hold the fondant on the cake and to preserve the smooth texture of the fondant. I made this buttercream frosting to use as my "glue" for the entire cake. Only make it right before you assemble the cake. If it sits in the fridge it will become more hard.
Cake - I used this gluten free vegan vanilla cake recipe I found online. I followed it almost exactly except I used cinnamon applesauce instead of unsweetened applesauce. Overall the cake held together nicely which is what mattered most. It had a consistency similar to that of banana bread. but still tasted good. For my bus I made one batch of this cake. I used two loaf pans and one 8x8 to make my pieces. I poured about 1/4 of the mix into each loaf pan and then the remaining half into the 8x8 pan. I've never seen a gluten free vegan cake mix rise this much so if you are worried about it not being enough, it does rise quite a bit! Allow the cake to cool for 10 minutes in the pan before flipping the cake out and onto a cooling rack. Allow cake to cool completely before assembling the bus.
The Assembly -
Step 1: Pull out all of your ingredients and tools. You will need your fondant, cake pieces, a sharp knife, powdered sugar, a rolling pin, a serving platter, wooden kabob sticks, a butter knife and your buttercream frosting. I found the fondant needed to sit out of the fridge for a little bit (at least 10 minutes) before I could really have much success rolling it out. Even then it will still take some work. I treated it like any other dough and used powdered sugar as my dusted surface and to keep it from sticking to everything.
Step 2: Using a powdered sugar dusted surface, roll out the green fondant. Place rolled out fondant over the serving platter and cut off the excess with a sharp knife.
Step 3: Cut the 8x8 square of cake to the size of a the loaf pan pieces. Your 8x8 piece should not be as thick as the loaf pan pieces. If it is thick, cut it to make it shorter. Place the piece in the middle of the green fondant platter. Frost the piece of cake with buttercream frosting until smooth. Roll out another piece of green fondant and cover the cake piece. Cut off excess fondant. You should now have a green platter with a "hill" on it.
Step 4: Using a serrated knife cut one loaf pan piece across the top and bottom (if necessary) to make flat surfaces. Place this piece on top of the "hill." Frost the top with buttercream frosting. Then cut the second pan loaf piece across the bottom, if necessary, to achieve a flat surface. Leave the top of the second piece rounded for the bus roof. Cut about 3 inches off the end of the loaf to create the front end of the bus. Place this piece on top of the buttercream frosted pan loaf piece.
Step 5: Cut kabob sticks slightly shorter than the height of the bus. Place sticks throughout the bus to attach and hold the 3 cake pieces together.
Step 6: Generously frost the entire bus with buttercream frosting creating a smooth surface across the entire cake.
Step 7: Roll out the yellow fondant in a rectangle larger than the actual bus. Gently place fondant over the cake pieces and press the fondant against the cake/frosting with your fingers. Pinch the edges of the bus and where the fondant gathers to form the fondant around the edges. Use a sharp knife to cut the excess fondant off. Be careful around the edges and pinch the fondant as you go to avoid any gaps. I used a wet finger to help seal the corners. Some edges weren't the prettiest but it worked well enough for my first time with it.
Step 8 : Roll out the black fondant. Cut out windows for the sides, front and back and place on the bus using buttercream frosting as your "glue." Cut out stripes for the sides of the bus and attach with buttercream frosting. Cut out bumpers and a grill for the front and attach with buttercream frosting. Roll out tires. I used a small measuring cup to cut around and make a perfect circle. Cut out a rectangle for the door.
Step 9: Roll out the white fondant. Cut strips to create a window frame on the black rectangle. Cut small circles for the headlights. Attach both pieces with buttercream frosting.
Step 10: Roll out the red fondant. Cut out taillights and a stop sign. Attach with buttercream frosting. Now that I think about it, I should have also used red fondant to make the flashing lights at the top of the bus!
Step 11: Wrap well with plastic wrap and keep in the fridge until you are ready to serve.
Tip: I kept the cake and buttercream frosting in the fridge as much as possible during assembly and only pulled it out to attach fondant pieces.


And my favorite picture of the day...
 |
| Oliver is mad because he has to take pictures while his cousin plays with his toys. |
No comments:
Post a Comment